Getting the right fit for a rubber hose is crucial for performance and safety, whether you’re working on a car, a garden project, or industrial equipment. An incorrect size can lead to leaks, inefficient operation, or premature failure. This guide will walk you through the essential steps to accurately measure a rubber hose.
This post simplifies the process by focusing on the three critical measurements: the Inner Diameter (ID), the Outer Diameter (OD), and the overall length. You’ll learn the best tools to use and how to apply these measurements to ensure you purchase the perfect replacement hose every time.
Why Need to Measure Rubber Hoses?

Accurately measuring rubber hoses is a critical step that prevents operational failures, costly downtime, and potential safety hazards. When replacing or installing a hose, the correct dimensions—Inner Diameter (ID), Outer Diameter (OD), and length—are non-negotiable for a perfect seal and optimal performance.
Why You Must Measure Your Rubber Hoses Precisely:
- Ensure Proper Sealing and Prevent Leaks: Getting the Inner Diameter (ID) correct is vital because it determines the fit onto the fitting or coupling. A hose with an ID that is too large will not seal properly, leading to leaks, loss of fluid pressure, and potential system damage. Correct measurement guarantees a secure, leak-free connection.
- Maintain Optimal System Flow and Pressure: The size of the hose directly impacts the flow rate and pressure within your system. Using a hose with an ID that is too small restricts the flow, causing increased pressure drop and system strain. Accurate measurement ensures the hose can handle the intended volume efficiently, avoiding bottlenecks.
- Prevent Premature Rubber Hose Failure and Wear: The Outer Diameter (OD) is important for proper clamping and clearance in tight spaces. An incorrect OD can lead to over-tightening of clamps, damaging the hose material, or cause rubbing against other components. Correct sizing minimizes stress and abrasion, significantly extending the hose’s lifespan.
- Guarantee Correct Installation and Length: The overall length must be precise to avoid stretching or excessive bending, both of which weaken the hose and reduce its lifespan. A hose that is too short will pull on fittings, while one that is too long can kink or rub. Proper length measurement ensures a smooth, tension-free installation.
How to Measure a Rubber Hose?
Accurately measuring a rubber hose is simple once you know the three critical dimensions: Inner Diameter (ID), Outer Diameter (OD), and overall length. Using the correct tools ensures a perfect fit, preventing leaks and maximizing the life of your hose in any application.
Before starting any measurement, ensure you have the right tools on hand to guarantee accuracy. Using precision instruments is key to obtaining the critical dimensions—ID, OD, and length—which will ensure your replacement hose fits perfectly and functions safely within your system.
Tools Needed
- Ruler or Tape Measure: Used primarily for determining the overall length of the hose. A flexible tape measure works best for longer or curved sections.
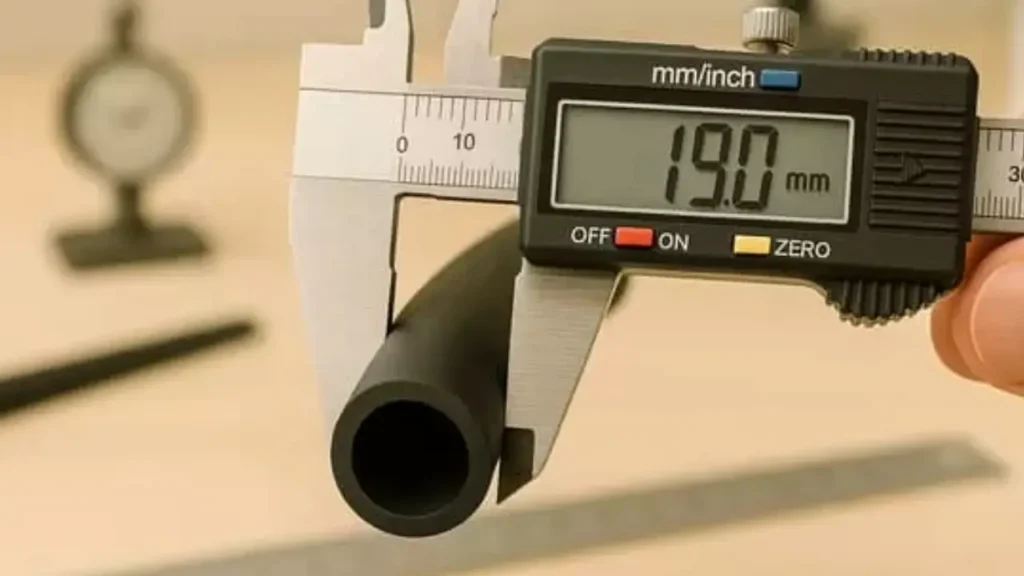
- Calipers (Vernier or Digital): The ideal tool for accurately measuring both the Inner Diameter (ID) and the Outer Diameter (OD) with high precision.
- Micrometer: A highly accurate tool, often preferred for measuring the Outer Diameter (OD) and the wall thickness of the rubber hose.
- Utility Knife or Scissors: Needed to make a clean, square cut on the hose end if you are measuring an existing piece to confirm wall thickness.
Step 1: Safety First – Depressurize and Drain
Before starting any measurements, always ensure the hose and system are fully depressurized and drained of any fluids. This prevents spills and injuries. Disconnect the hose completely from the system and fittings to get accurate, stress-free measurements.
After safely disconnecting the hose, clean the outside thoroughly to remove any dirt or residue. A clean hose allows for more precise measurement, especially when using calipers or a micrometer to determine the hose’s outer dimensions.
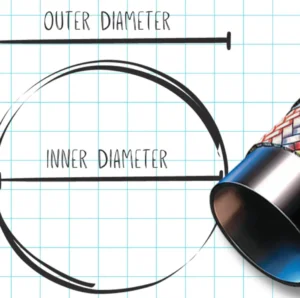
Step 2: Measure the Inner Diameter (ID)
The Inner Diameter (ID) is the most crucial hose measurement, defining the size of the coupling and the flow rate. Use a set of calipers or a ruler placed across the inside of the hose end. Measure from one interior wall to the exact opposite interior wall.
This measurement determines the proper fitting size; a mismatch will cause leaks or connection failure. The ID is usually the specification you see listed first when ordering a replacement hose, so ensure your measurement is precise.
Step 3: Determine the Outer Diameter (OD)
The Outer Diameter (OD) is the measurement across the entire hose, including the rubber wall thickness. This dimension is important for clamp sizing and for ensuring the hose fits within restricted spaces. Use calipers or a micrometer for the best accuracy.
Place the jaws of the caliper around the hose, perpendicular to its axis, and gently close them until they touch the outer surface. Make sure you are measuring the rubber hose itself, not any external braiding or reinforcement.
Step 4: Measure the Overall Length
Measure the overall length from end to end for straight hose assemblies using a flexible tape measure or ruler. If the hose has permanently attached fittings, measure from the seating surface of one fitting to the seating surface of the other to account for the functional length.
For hoses with bends or complex shapes, you may need to measure along the center line of the hose for the most accurate figure. Lay the hose straight or trace its path carefully to avoid misrepresenting its total operational length.
Step 5: Check Hose Wall Thickness (Optional but Recommended)
While optional, measuring the wall thickness provides a good check of the hose’s strength and confirms the OD and ID readings. You can calculate it by subtracting the ID from the OD and dividing the result by two.
For a direct measurement, use a micrometer to measure the thickness of the material cut from a clean, flat section of the hose wall. This step helps confirm the integrity and pressure rating of the hose material.
Step 6: Note the Material and Pressure Rating
The rubber material (e.g., EPDM, PVC, Nitrile) and the maximum working pressure rating are essential specifications. These are often printed on the hose layline but should be confirmed. This ensures the replacement hose is chemically compatible and structurally safe.
Selecting the wrong material can lead to rapid degradation, while ignoring the pressure rating is a major safety hazard. Always record these details alongside your dimensional measurements before purchasing a new hose.
How to Choose Suitable Rubber Hose Sizes?

Choosing the correct size for a rubber hose extends far beyond simply matching the old piece; it’s about maintaining the engineered performance of your entire system. The right size ensures proper fluid flow, pressure efficiency, and a secure, leak-proof connection that prevents premature hose failure.
Key Criteria for Selecting the Right Rubber Hose Size:
- Inner Diameter (ID) for Flow Rate: The ID is the most critical factor for performance. It must be wide enough to support the required flow rate (gallons or liters per minute) without causing excessive fluid velocity. Too small an ID creates friction, generating heat and causing a significant, system-damaging pressure drop.
- Outer Diameter (OD) for Space and Clamping: The OD is vital for installation. It must fit the available space and be compatible with the clamping or coupling mechanism. An OD that is too large may rub against surrounding equipment, leading to abrasion and early failure, while an OD that is too small prevents a secure, high-pressure seal.
- Overall Length for Movement and Tension: The hose length must be sufficient to connect two points without any stretching or kinking, which are major causes of failure. Account for any movement, vibration, or thermal expansion in the system. An improperly sized length will place undue stress on the hose and fittings.
- Pressure Rating and Wall Thickness: Hose wall thickness is directly related to the maximum working pressure (WP) it can safely handle. Always choose a hose where the WP is equal to or greater than your system’s maximum operating pressure, including any transient pressure spikes. Thicker walls usually mean a higher pressure rating.
Techniques for Accurate Sizing Rubber Hoses
We provide methods for accurately sizing rubber hoses, ensuring they meet the precise demands of your fluid transfer applications. Correct sizing is paramount for maintaining system efficiency, preventing premature wear, and guaranteeing the safe operation of your equipment. We offer key techniques to determine the necessary dimensions, focusing on length, inner diameter, and overall hose configuration.
Critical Dimensions for Hose Sizing
- Determine Overall Length The overall length is a crucial measurement. We manufacture hoses according to the required length, which dictates how the hose will route through your system. This measurement includes the hose itself and any attached fittings or couplings. Accurate length ensures proper installation tension and avoids unnecessary stress. We supply assemblies that fit perfectly.
- Measure Inner Diameter (ID) The inner diameter is vital as it directly impacts flow rate and velocity within the hose. We offer solutions with specific ID measurements to handle the required volume of fluid efficiently. An incorrect ID can lead to pressure drops or excessive friction. We manufacture to tight tolerances, ensuring optimal performance for your specific application requirements.
- Specify Outer Diameter (OD) The outer diameter is necessary, especially when considering hose routing and clearance within confined spaces. We provide specifications for OD, which includes the hose wall and any reinforcement layers. This dimension is important for compatibility with clamps, brackets, and protective sleeves. We supply comprehensive dimensional data for seamless integration.
- Confirm Fitting Compatibility We offer a comprehensive range of fittings, and confirming their compatibility with the hose ends is essential for a leak-proof connection. We manufacture assemblies where the end fittings precisely match the hose type and thread requirements. This guarantees a secure and reliable seal, preventing fluid loss or system contamination. We provide reliable fluid transfer solutions.
Conclusion
Mastering the measurement of a rubber hose—getting the ID, OD, and length correct—ensures your systems run smoothly and safely. Taking the time for accurate measurement prevents costly errors and downtime, giving you confidence in your setup. Remember, precision is key to longevity and performance in any application involving fluid transfer.
Now that you’re an expert in rubber hose measurement, you’re ready to source the highest-quality replacements. For reliable, durable, and precise rubber hoses for any industrial, automotive, or custom need, look no further. We offer a vast inventory of standard and custom sizes to match your exact specifications.
Ready to implement your new knowledge? Gushan Rubber is your trusted partner for wholesale rubber hoses. Contact us today to discuss your project and explore our wide selection of high-performance hoses, all designed and manufactured to the strictest quality standards. Get a quote and keep your operations running optimally!