Hydraulic hose crimping is an essential process for creating secure, leak-free connections in hydraulic systems. Proper crimping ensures that the hose is tightly fitted to the fittings, providing strong and reliable performance. In this blog, we’ll explain the key steps involved in crimping hydraulic hoses for optimal results.
The right crimping technique not only ensures safety but also extends the life of the hydraulic system. A poorly crimped hose can lead to leaks or system failures, which can be costly and dangerous. Let’s walk through the process of crimping hydraulic hoses correctly to ensure safe and efficient operation.
What Is Hydraulic Hose Crimping
Hydraulic hose crimping is a process used to securely attach a fitting to a hydraulic hose. This process is crucial for ensuring the safety and reliability of hydraulic systems, as it prevents leaks and maintains proper pressure.
Hydraulic Hose Crimping Tool
Hydraulic hose crimping tools are essential equipment for repairing and maintaining hydraulic systems. They are used to securely connect hydraulic hoses to fittings by crimping ferrules onto the hose ends.
Types of Hydraulic Hose Crimping Tools:
There are several types of hydraulic hose crimping tools available, each with its own advantages and disadvantages:
- Manual Hydraulic Hose Crimpers: These are portable and easy to use, making them ideal for on-site repairs. However, they require significant physical effort to operate.
- Electric Hydraulic Hose Crimpers: These tools are powered by electricity and offer greater ease of use and faster crimping speeds compared to manual crimpers. They are suitable for both shop and field use.
- Pneumatic Hydraulic Hose Crimpers: These tools are powered by compressed air and offer even faster crimping speeds than electric crimpers. They are best suited for high-volume crimping applications in workshops.
Choosing the Right Crimping Tool:
When choosing a hydraulic hose crimping tool, consider the following factors:
- Hose Size: The tool should be capable of crimping the specific size of hose you need to work with.
- Crimping Force: The tool should generate enough force to properly crimp the ferrule onto the hose.
- Portability: If you need to use the tool on-site, a portable model is essential.
- Ease of Use: The tool should be easy to operate and maintain.
- Cost: The cost of the tool will vary depending on the features and capabilities.
By carefully considering these factors, you can select the best hydraulic hose crimping tool for your specific needs.
How to Crimp Hydraulic Hoses?
Crimping hydraulic hoses is a critical process for ensuring secure, leak-free connections in hydraulic systems. A properly crimped hose ensures that the fitting stays firmly in place under pressure, preventing failures.
In this guide, we’ll walk you through the necessary steps and tools required to crimp hydraulic hoses effectively for optimal performance and safety.
Step 1. Prepare Your Workspace and Tools
The first step in the process of crimping a hydraulic hose is to establish a clean and well-organized workspace. This ensures that all necessary tools are readily accessible and that there is ample room to maneuver the hose and fitting assembly.
The essential tools required for this task include a hose cutter, a hose deburring tool, a fitting insertion tool, a hydraulic hose crimping machine, and the appropriate dies that are compatible with the specific hose and fitting combination being used.
Step 2. Select the Right Hose and Fitting
Once the workspace is prepared, the next step is to carefully select the appropriate hose and fitting. The hose must be chosen based on its compatibility with the fluid, pressure, and temperature requirements of the intended application.
Factors such as reinforcement, flexibility, and chemical resistance should also be considered when selecting a hydraulic hose. The fitting, on the other hand, must be compatible with both the hose size and thread type, as well as the crimping machine and dies that will be used to secure the connection.
Step 3. Measure and Cut the Hose
After selecting the appropriate hose and fitting, the hose must be accurately measured and cut to the desired length using a hose cutter.
It is crucial to ensure that the cut is clean and precise to avoid any potential damage to the fitting or the crimping process.
Step 4. Deburr the Hose End
Following the cutting process, the cut end of the hose must be deburred using a deburring tool. This step is essential to remove any sharp edges that may have formed during the cutting process.
Removing these sharp edges prevents potential damage to the fitting and ensures a clean and smooth connection.
Step 5. Insert the Fitting
The next step involves inserting the fitting into the hose. To facilitate this process, a light lubricant can be applied to both the fitting and the inside of the hose.
A fitting insertion tool is then used to gently push the fitting onto the hose to the specified depth. It is important to ensure that the fitting is fully seated to prevent any potential leaks or issues during the crimping process.
Step 6. Prepare the Crimping Machine
Once the fitting is inserted, the crimping machine must be prepared. This involves selecting the correct dies for the specific hose and fitting combination being used.
The crimping machine must also be calibrated to the appropriate pressure and stroke settings to ensure a proper and secure crimp.
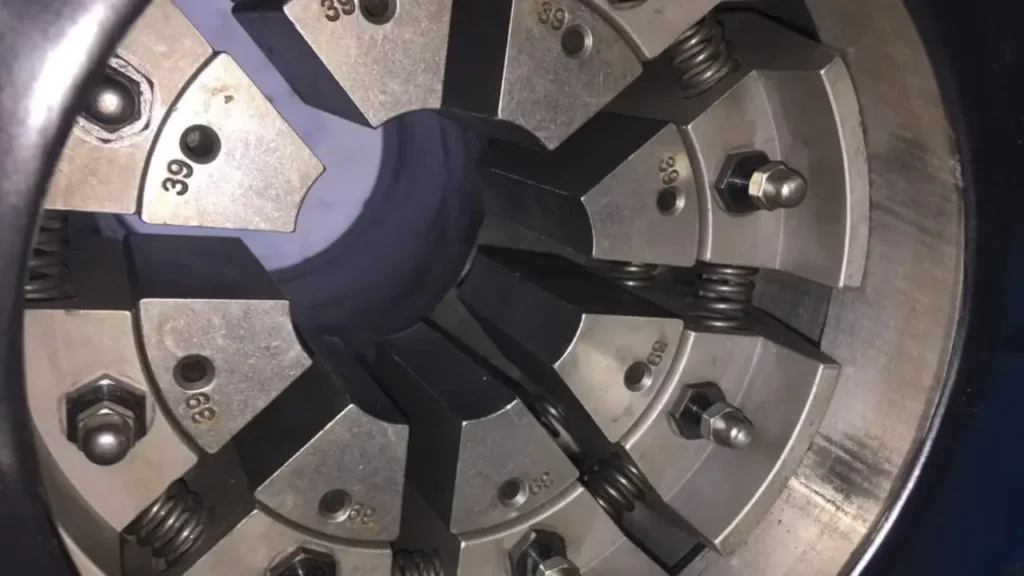
Step 7. Crimp Hydraulic Hose
With the crimping machine prepared, the hose and fitting assembly is carefully positioned into the machine, aligning it with the selected dies.
The crimping machine is then activated, applying pressure to the fitting and forming a secure bond with the hose. Once the crimping cycle is complete, the hose assembly is released from the machine.
Step 8. Inspect the Crimped Joint
The final step in the hydraulic hose crimping process is to thoroughly inspect the crimped joint. This involves a visual inspection to identify any potential defects, such as misalignment, cracks, or excessive deformation.
Additionally, a dimension check is performed using a caliper or other measuring tool to verify that the crimp diameter meets the specified requirements.
By following these detailed steps and prioritizing safety, individuals can successfully crimp hydraulic hoses and ensure the integrity of their hydraulic systems.
Importance of Proper Crimping:
- Prevents Leaks: A properly crimped joint ensures a leak-free connection, preventing fluid loss and potential safety hazards.
- Maintains Pressure: A secure crimp maintains the system’s pressure, ensuring optimal performance of hydraulic equipment.
- Ensures Longevity: Proper crimping extends the life of the hydraulic hose and fittings, reducing the need for frequent replacements.
Safety Considerations:
- Use Proper Tools: Utilize specialized crimping tools designed for the specific hose and fitting types.
- Wear Protective Gear: Always wear safety glasses, gloves, and other protective equipment when handling hydraulic hoses and fittings.
- Follow Manufacturer‘s Instructions: Adhere to the manufacturer‘s guidelines for hose and fitting selection, cutting, and crimping procedures.
How to Use a Hydraulic Hose Crimper?
Using a hydraulic hose crimper is essential for creating secure, leak-free connections in hydraulic systems. By following the correct steps, you can ensure that the hose fittings are properly crimped to withstand high pressures. This guide will walk you through the process of using a hydraulic hose crimper effectively.
Step 1: Gather Necessary Tools
Tools Needed:
- Hydraulic hose crimper
- Crimping dies
- Hydraulic hose
- Fittings
- Tape measure
Before starting, ensure you have the necessary tools for the crimping process. The hydraulic hose crimper is the main tool, along with crimping dies of the correct size for your hose and fittings. A tape measure will help you cut the hose to the required length before crimping.
Measure the hose length accurately, and ensure that the hose and fittings are compatible. This step is important for ensuring that the crimping process creates a secure and leak-proof connection. Take care to select the right crimping dies that match your hose size and the fitting’s specifications for the best results.
Step 2: Cut the Hose to the Correct Length
Once you have your tools, use a hose cutter to cut the hydraulic hose to the desired length. Make sure the cut is straight and clean to ensure the hose fits properly into the crimping machine. A clean cut will also help avoid leaks or misalignments when the hose is crimped.
Be cautious during this step, as any jagged edges can cause issues during the crimping process. Double-check the measurements before cutting to prevent errors. Cutting the hose accurately ensures that the fitting will be installed tightly, minimizing the risk of leaks and ensuring optimal performance of your hydraulic system.
Step 3: Insert the Hose into the Fittings
Next, slide the hydraulic hose into the fitting. The hose should be inserted far enough for the crimp to secure the fitting firmly in place. Be sure that the hose is fully seated within the fitting before starting the crimping process.
It’s essential to ensure proper alignment between the hose and fitting. Any misalignment can result in an improper crimp, which could lead to leaks or a weakened connection. Take your time to verify the hose is inserted correctly to ensure a strong, leak-free connection after crimping.
Step 4: Position the Hose in the Crimper
Once the hose and fitting are properly aligned, place them in the hydraulic hose crimper. Ensure that the crimping die is the correct size for the hose and fitting. Position the assembly inside the crimper, making sure it is held securely and evenly.
Proper positioning in the crimper is crucial for achieving a uniform, tight crimp. If the hose and fitting are not positioned correctly, the crimp may be uneven, resulting in a weak connection. Ensure the fitting is fully supported by the crimper for optimal crimping pressure and a secure seal.
Step 5: Crimp the Hose
Activate the hydraulic hose crimper to apply pressure and crimp the fitting onto the hose. Follow the manufacturer’s instructions for the crimping pressure and cycle time. The crimper will press the fitting onto the hose tightly, ensuring a secure and leak-proof connection.
Once the crimping is complete, carefully remove the hose assembly from the crimper. Inspect the crimp to ensure it’s uniform and that the fitting is securely attached to the hose. If the crimp is done correctly, the fitting should be firmly in place, with no gaps or loose areas around the connection.
Conclusion
Crimping hydraulic hoses correctly is vital for ensuring secure and reliable connections in hydraulic systems. By following the right procedures and using quality crimping tools, you can avoid leaks and system failures. Proper crimping also enhances the overall performance and longevity of your hydraulic equipment.
At Gushan Rubber, we offer hydraulic hoses designed to meet the demanding needs of various industrial applications. Our hoses are manufactured with durability and efficiency in mind, ensuring that your hydraulic systems perform optimally over time. Whether you need standard or custom hoses, we have the right solution for you.
For reliable and affordable hydraulic hoses, Gushan Rubber provides wholesale options to suit your needs. Our competitive pricing and superior customer service ensure that you get the best products for your hydraulic systems. Contact us today to learn more about our wholesale hydraulic hoses and how we can support your business.